In today’s digital world, SD cards are essential for storing photos, videos, and other files across various devices. However, there are times when you may need to format your SD card to clear space, remove corrupted data, or prepare it for a new device.
If you’re a Mac user, formatting an SD card is a straightforward process, and this comprehensive guide from NewsPivot will walk you through it.
How to Format SD Card on Mac
Step 1: Insert the SD Card
First of all, insert your SD card into the SD card slot on your Mac, if available. If your Mac doesn’t have a built-in SD card slot, you can use an external SD card reader to connect it to your computer’s USB port.
Step 2: Open Disk Utility
Once the SD card is connected, open Disk Utility which allows you to manage disks and partitions on your Mac.
Opening Disk Utility on a Mac is simple. Here’s how you can do it:
1) Using Finder:
- Click on the “Finder” icon in your Dock which is typically located on the bottom of your screen.
- In the Finder menu at the top of your screen, click on “Go.”
- From the dropdown menu, select “Utilities.”
- In the Utilities folder, you’ll find Disk Utility. Double-click on it to open.
2) Using Spotlight Search:
- Press the “Command-Space bar” at the same time to bring up Spotlight Search.
- Type “Disk Utility” into the search bar.
- Once Disk Utility appears in the search results, you can double click to open it.
3) Using Launchpad:
- Click on the Launchpad icon in your Dock, which resembles a rocket ship.
- In Launchpad, you’ll find Disk Utility among your applications. Click on its icon to open.
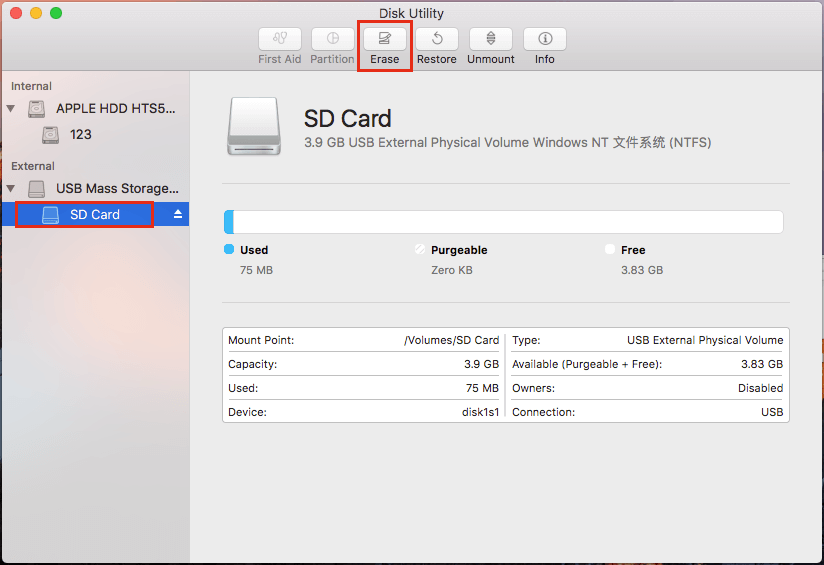
Step 3: Select the SD Card to Erase
In Disk Utility, you’ll see a list of all connected storage devices on the left-hand side. Now locate and select your SD card from the list.
With your SD card selected, click on the “Erase” button at the top of the Disk Utility window. This will open a new window where you can specify the format for your SD card.
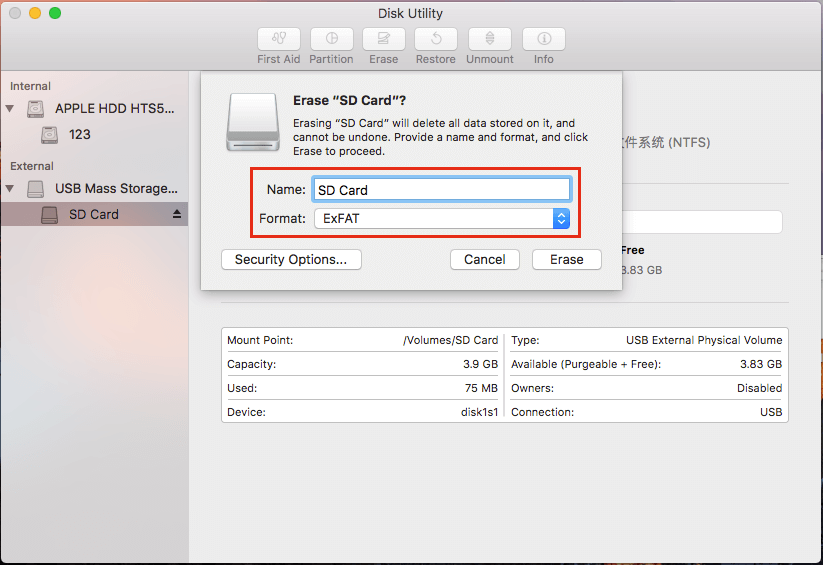
Step 4: Specify the Format Options & Name Your SD Card
Typically, you will be provided with several file system options. The available options may vary depending on the version of macOS you’re using, but here are some common file system options:
- exFAT (Extended File Allocation Table): a file system format developed by Microsoft, designed to be used on flash drives like SD cards. It supports large files and volumes and is compatible with both Windows and macOS, making it a popular choice for cross-platform usage.
- MS-DOS (FAT): an older file system format commonly used for compatibility with older devices, including cameras, game consoles, and other electronics. Compared to exFAT, FAT has limitations on file size and volume size.
- Mac OS Extended (HFS+) / APFS (Apple File System): Mac OS Extended (HFS+) was the default file system for Mac computers for many years. It’s still an option for formatting storage devices on macOS. APFS (Apple File System) is the newer file system introduced by Apple and is optimized for use with SSDs and flash storage, offering features like encryption, snapshots, and improved performance.
Depending on your specific needs and the devices you intend to use the SD card with, you can choose the appropriate file system format during the formatting process.
For most SD cards, it is recommended to format SD card Mac FAT32 or exFAT as they offer compatibility with both Mac and Windows systems. However, if you only plan to use the SD card with Mac devices, you can select “Mac OS Extended (Journaled)” or “APFS.”
Give your SD card a name in the “Name” field. While this step is optional, naming your SD card can help you identify it more easily, especially if you have multiple SD cards.
Step 5: Start the Formatting Process
Once you’ve selected the format and named your SD card, double-check your settings to ensure everything is correct. When you’re ready, click on the “Erase” button to begin the formatting process.
Disk Utility will now format your SD card according to the selected settings. The time it takes to complete will depend on the size of the card and the chosen format. Be patient and avoid interrupting the process.
Step 6: Eject and remove the SD Card
Once the formatting process is complete, you’ll see a notification indicating success. You can now safely eject your SD card from your Mac by clicking on the eject icon next to its name in Finder.
Finally, physically remove the SD card from your Mac or external card reader. Your SD card is now formatted and ready to use for storing your files.
Also Read: How to Find Saved Passwords and Passkeys on Your Mac
Wrapping Things Up
Formatting SD card on macOS is a simple yet essential process that ensures optimal performance and compatibility with various devices. By following this comprehensive step-by-step guide, you can confidently format your SD card and continue using it for all your storage needs. Remember always to double-check your settings and back up any important data before formatting to avoid accidental data loss.
About The Author

Position: Columnist
Rodin is an enthusiastic IT writer focusing on Windows trends, disk partition management and data recovery. She loves to write and share her idea about the useful tips and tricks on personal computers' maintenance... If you are looking for methods to improve your computer performance, manage hard drives and recover data from different devices, Rodin can provide reliable solutions for data management.